1046Resizing & Compressing Movies with ffmpeg

Resizing Movies with ffmpeg

Scaling down Full HD from 1920x1080 to 960x540:

ffmpeg -i input.mp4 -s 960x540 -c:a copy output.mp4

-i ... input
-s ... scale
-c ... codec

Compressing with H.2645

ffmpeg -i input.mp4 -vcodec libx265 -crf 28 output.mp4

crf ... video quality, lower value means better quality

1030Concatenating Videos with ffmpeg

Concatenating videos with the Quicktime Player requires unnecessary decoding/encoding, with takes time and computational resources.

Solution: Concatente Files von FFMPEG

https://trac.ffmpeg.org/wiki/Concatenate

Using ffmpeg

  1. Create a list: mylist.txt

    file '/path/to/file1.mp4'
    file '/path/to/file2.mp4'
    file '/path/to/file3.mp4'
  2. Run ffmpeg ffmpeg -f concat -i mylist.txt -c copy output.mp4

Troubleshooting

[concat @ 0x7fc407904080] Unsafe file name '2008-08-05 21_38_08.mov' mylist.txt: Operation not permitted

Filenames should not have spaces, escape them with \.

895QuickTime Player – Interrupted Video Recording Session


QuickTime Player Version can record movies. If the recording process in interrupted by battery running out, or the computer being closed and put to sleep, the video file is store at the following location: ~/Library/Containers/com.apple.QuickTimePlayerX/Data

QuickTime Player Version: 10.4

389Realtime Video on the iPhone from a Local Server

Following Problem: How do stream video from a local machine to an iPhone OS device in real time? Real-time is an absolutely necessary. That basically rules out the HTTP Streaming Server (as described previously), as it's capable of streaming to multiple clients, but has to sacrifice real time for that.

I looked a bit into sending the video packets via UDP, but that would create the challenge of having to know the IP address of the device. Not to mention the overhead of re-assembling the packets into video frames and keeping them somewhat synced. And althought the max. possible size of UDP datagramms is about 65K, the wireless router needs to be configures to handle jumbo-sized packets as well. Hmmm.

There must be a simpler way...

As this is only on a local network, and only intended for one recipent, I was wondering, whether the network speed would be high enough to deliver 25fps via a plan Apache server..?

I made a simple Max patch, that would capture the video and write a jpeg image every 40ms, this should give us 25fps. Of course this can be done with any other software as well. If you think that might be to much strain on the harddisk, have a look on how to set up a RAM Disk on arbitraty mountpoint, for example in your local webserver directory.

So we have our webserver, our live-update image: 192.168.20.117/live.jpg

Viewing it in a browser an refreshing it should give you updated images. So far so good. (Of course, the address is my local address, yours might vary.)

Now, basically all we have to do is to make a simple iPhone Appli, ask it to reload the image periodically and display the image.

  • create a NSURLConnection and point it to the image address

  • collect the data, and display it once the download is completed

  • download the image again after 40ms.

What can I see, I am surprised it works quite well. Clearly there are some troubles: about 1% of the returned images feature not data, which would result in a flicker on the iPhone... A simple test, whether the received [data length] > 0 takes care of that problem. I am guessing, that this is caused by a collision of the write time of the max patch and the download time of the iPhone application, but I am not 100% sure. If anyone knows the answer, let me know.

And, yeah, I should really make a videp demo-ing that...

Anywhere, here are the juicy bits of the code:

- (void)loadView {
    [super loadView];
    NSLog(@"start");

    reloadImageView = [[UIImageView alloc] initWithFrame:CGRectMake(0.0, 0.0, 480, 320)];
    reloadImageView.center = CGPointMake(160.0, 240.0);
    reloadImageView.transform = CGAffineTransformMakeRotation(M_PI/2);

    [self.view addSubview:reloadImageView];

    self.view.backgroundColor = [UIColor blueColor];

    [reloadImageView release];

    struct timeval tv;
    gettimeofday(&tv, NULL);
    diff = tv.tv_sec;

    [self downloadImage];
}

- (void)downloadImage {
    startTimestamp = [self currentTime];

    NSString *address = @"http://192.168.20.117/live.jpg";

    NSURLRequest *request = [NSURLRequest requestWithURL:[NSURL URLWithString:address]];
    [NSURLConnection connectionWithRequest:request delegate:self];
}

- (void)connection:(NSURLConnection *)connection didFailWithError:(NSError *)error {
    downloadErrors++;
    [self downloadImage];
}

- (void)connection:(NSURLConnection *)connection didReceiveResponse:(NSURLResponse *)response {
    //NSLog(@"didReceiveResponse");
    data = nil;                                                 // clear
    [data release];                                             // release
    data = [[NSMutableData alloc] initWithCapacity:20000];      // create & retain

}

- (void)connection:(NSURLConnection *)connection didReceiveData:(NSData *)partialData {
    //NSLog(@"didReceiveData");
    [data appendData: partialData];
}

- (void)connectionDidFinishLoading:(NSURLConnection *)connection {
    //NSLog(@"connectionDidFinishLoading");

    float difference = (([self currentTime] - startTimestamp) - 0.040);
    if ([data length] > 0) {
        // check if data has content (displaying an empty data 
        // images shows nothing, but flashes the background)
        reloadImageView.image = [UIImage imageWithData:data];
        imagesDownloaded++;
        totalBytes += [data length];
    } else {
        zeroBytes++;
    }

    if (difference < 0) {
        [self performSelector:@selector(downloadImage) withObject:nil afterDelay:fabs(difference)];
    } else {
        [self downloadImage]; // loop
    }

}

- (float)currentTime {
    struct timeval tv;
    gettimeofday(&tv, NULL);
    float msec = tv.tv_usec / 1000000.0;
    float current = (tv.tv_sec - diff) + msec;
    return current;
}

And here is the whole demo Xcode project. Make sure to change the image address to your local image. I also include a simple Max-patch, that saves images from a camera to disk.

Update Although the initial diff timer was in the sniplet here, it did not make it in the original Xcode project. Mistake corrected, now the Xcode project should reflect the code here.

387Near Live Streaming to the iPhone with Apple’s HTTP Streaming Server

First and foremost, read this: HTTP Live Streaming Overview

Update to the latest HTTP Streaming Tools (Disk Image), Login Required. I'am using the ones posted on 08 Jan 2010, they can be found in the Downloads & ADC Program Assets > iPhone section.

I was a bit set back, when the documentation states, that one has to deal with a delay of about 30 seconds. If you are looking for real-time streaming, there might be other solution. Why 30 seconds? Apple recommends to segement your video stream into 10 second pieces, and it seems that 3 of them have to be loaded for streaming. Of course, the segement length can be changed, what would happen, if we change it to - say - 1 seconds? Live streaming closer to real-time?

Unfortunatly not. This seem to force the iPhone to make more connections to the server and pause the video more often than not it order to retrieve the next segment(s).

So, after installing the Segmenting Tools, they should be present at: /usr/bin/mediastreamsegmenter /usr/bin/mediafilesegmenter /usr/bin/variantplaylistcreator /usr/bin/mediastreamvalidator

I won't be too concerned with the other tools, and concentrate on getting a live stream to work. You guessed it, we need the mediastreamsegmenter for that.

Let's examine the basic workflow:

Video Source ➔ Segmenter ➔ Distribution

Distribution is done via an HTTP Server, that's the nice thing about this. No special server, no special port, just good, old HTTP. Not that Apple would give us that much choice, if it comes to streaming to the iPhone.

The Apple-provied segmenter is also not problem, other have been rolling their own. Go there, if you are adventurous.

Video Source

The biggest trouble for me was to set up the right video source. mediastreamsegmenter is quite picky in that way, and would only work with the right input.

A quick look at the mediastreamsegmenter man pages reveales the following.

  • it looking for an MPEG-2 transport stream either over UDP or over stdin.

  • it will only will only work with MPEG-2 Transport Streams as defined in ISO/IEC 14496-1. The transport stream must contain H.264 (MPEG-4, part 10) video and AAC or MPEG audio. If AAC audio is used, it must have ADTS headers. H.264 video access units must use Access Unit Delimiter NALs, and must be in unique PES packets.

Apple's FAQ suggest to use some commerical hardware encoders, but if it's not that convinient to get your hands on one of there, there's also a software solution in the form of the all-mighty VLC. (The purists might forgive my usage of the GUI.)

Open a new Capture Device (⌘G), and select screen capture, specify size and and framerate at will. Check the streaming/serving box and proceed to the 'Settings...' There you want to have a 'stream' transported via UDP, address should be 127.0.0.1 (if you mediastreamsegmenter is also on your local machine), any port not taken should do, let's take 50000. The Transcoding options for Video should be h264, the bitrate can be choosen according to your desired quality.

I though that was about it, but I was wrong. Remember, that the stream must use Access Unit Delimiter NALs? Well, here they are. VLC > Preferences > Video, then click at the 'all' Radio Button at the left corner, which should give you a detailed list of video preferences. Select 'Input / Codecs' > Video codecs > x264, and scroll at the setting to the very bottom. (Yes, it took me a while to find that.)
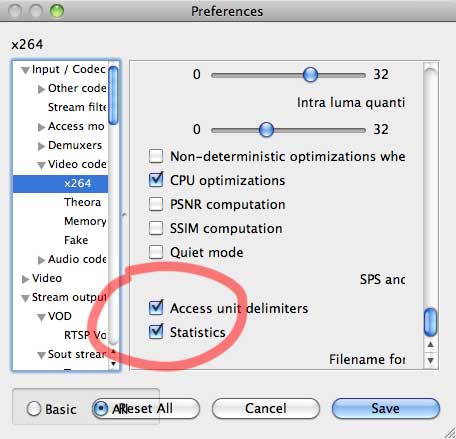
Enable the Access Unit Delimiters.

Ok, so now we have a nicely encoded Video Steam at 127.0.0.1:50000

Segmenter

Onwards to the segmenter. Having a look at the mediastreamsegmenter example in the man again, we know that it needs the following command:

mediastreamsegmenter -b http://192.168.20.117/live -s 3 -t 10 -D -f /Library/WebServer/Documents/live 127.0.0.1:50000

A quick walkthrough: -b http://192.168.20.117/live (also: -base-url) is where the .ts files are written and the stream can be accessed.

-s 3 (-sliding-window-entries) the number of files in the index file

-t 8 (-target-duration) we want 8 second slices (default: 10)

-D (-delete-files) delete .ts files if they are no longer needed

-f (-file-base) Directory to store the media and index files

...and last the IP-Address of our stream, in this case 127.0.0.1:5000

If everything worked, you should see the prog_index.m3u8 file and .ts files in the file base directory.

Distribution

The only thing left now is making a page, that serves the stream. This should not be too difficult. A simple page with the nice HTML5 video should be fine. I made this the index.html page, but of course any other is fine too.

<video width="320" height="240"> <source src="prog_index.m3u8" /> </video>

Ok, so now we know, how to do near real-time streaming to multiple clients, but what if you wanted to do real-time streaming to only a couple of WiFi-connected iPhone? That the topic for the next post.